
If you’re excited to improve the visuals of your favorite games on the Steam Deck, ReShade is the tool for you. It enhances graphics by adding new visual effects. Below, I’ll guide you through each step to install ReShade on your Steam Deck without assuming you have prior knowledge on the subject.
What is ReShade?
ReShade is a powerful graphical post-processing tool that allows you to enhance and redefine the visuals of almost any game. With ReShade, you can apply a wide range of filters and effects, from sharpening the image to adding depth of field, color correction, and more.
Getting Ready
Before diving in, make sure your Steam Deck is in Desktop Mode. This will allow you to access the terminal and enter commands.
Step 1: Download the ReShade Script
The reshade-linux script is designed to simplify the installation of ReShade on Linux systems, including the Steam Deck. Here’s how to get it:
- Access the Terminal: This is where we type commands. You can find it in your Steam Deck’s desktop mode.
2. Download the Script: Copy and paste this into the Terminal and press Enter. This command gets the script for us.
curl -LO https://github.com/kevinlekiller/reshade-steam-proton/raw/main/reshade-linux.sh3. Make the Script Executable: Now, we need to tell the Steam Deck that this script is safe to run. Type this command and press Enter:
chmod +x reshade-linux.shStep 2: Run the Script
With the script ready, we’re going to run it. This is the step that installs ReShade. Type this in the Terminal and hit Enter:
./reshade-linux.shWhen running the script, you’re prompted to either install or uninstall ReShade. For installation, you must provide the game’s directory path. The script then confirms the path and attempts to automatically detect the correct DLL files for ReShade.
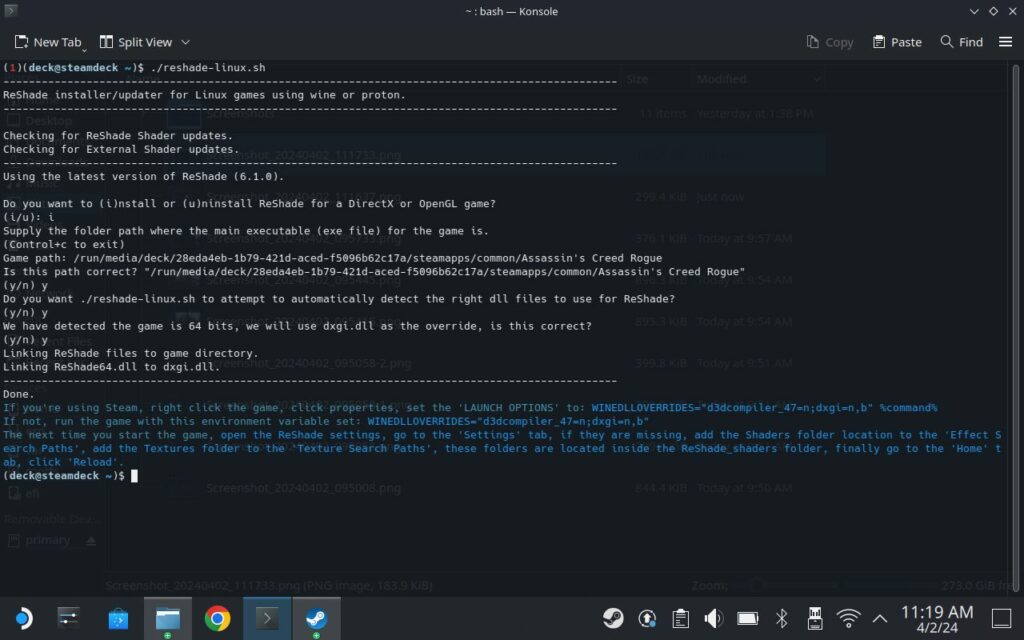
For selecting the game path, navigate in Steam to your game’s properties by clicking the cog icon, then to “Manage” and “Browse local files.”
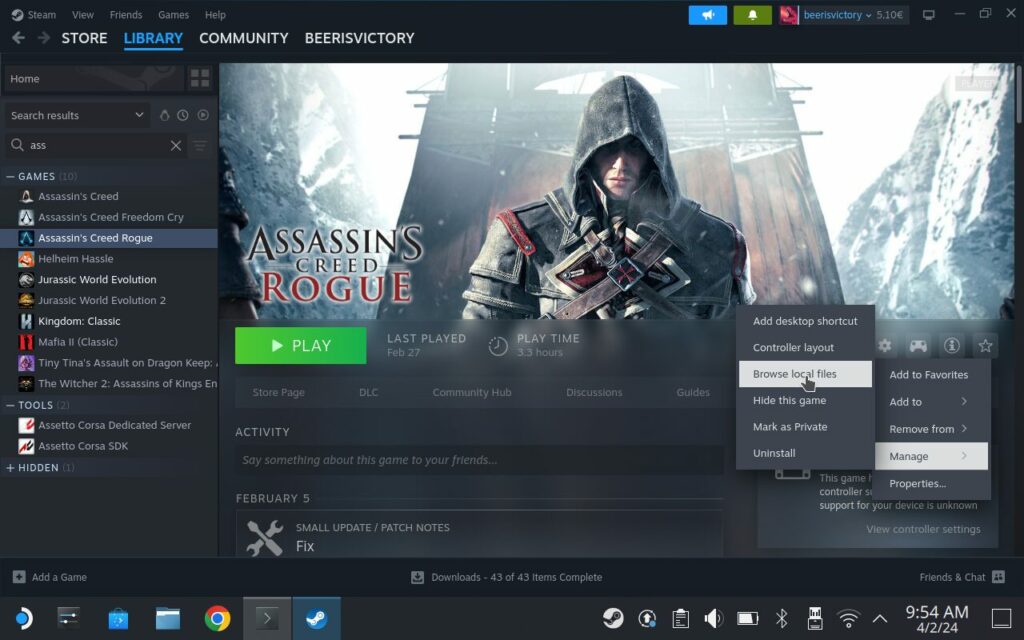
This opens the game’s folder. Copy the folder path from the navigation bar to use it when the script asks for the game path.
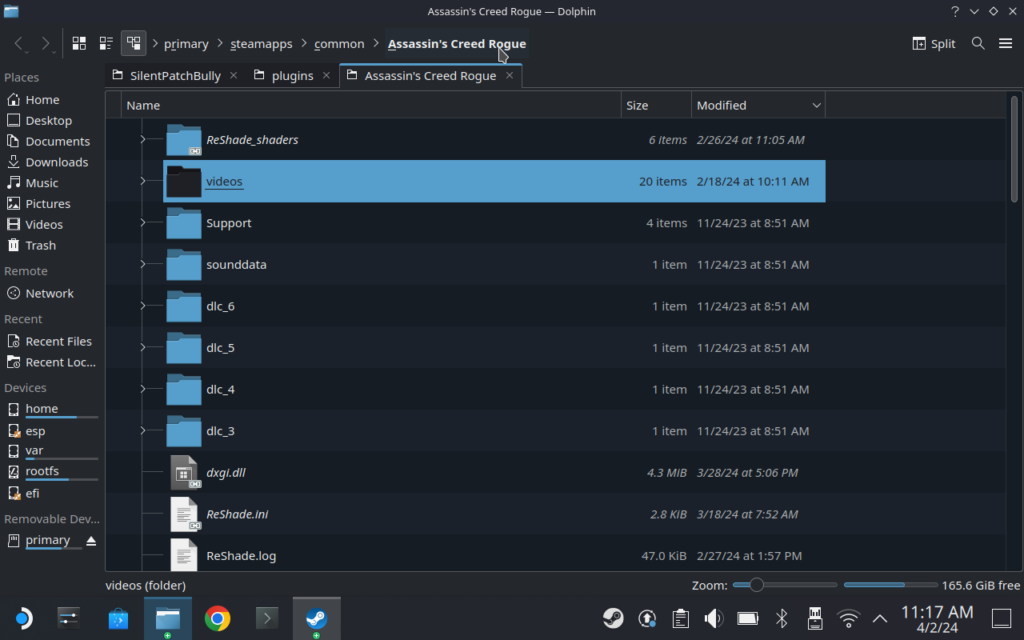
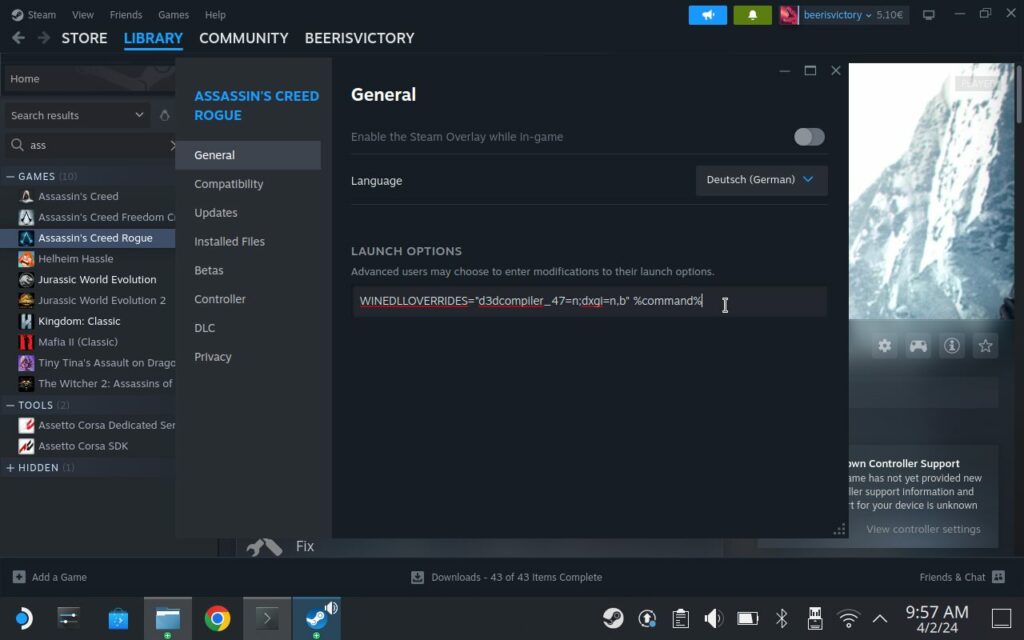
After linking ReShade files to the game directory, it instructs on setting launch options in Steam for the game to use ReShade properly.
To add launch options, right-click the game in Steam, choose “Properties,” and find the “Launch Options” section. Enter the required command provided by the script to ensure ReShade runs correctly with the game.
Step 3: Run the Game and Access ReShade
After installing ReShade, start your game to access the ReShade menu. Here’s how you can easily make adjustments:
- Run your game: Simply start any game you’ve installed ReShade for.
- Open the ReShade Menu: You’ll need to press a specific key to open the ReShade menu. This is typically the “Pos1” key on your keyboard, but since we’re using the Steam Deck, we’ll set up a controller button for this action.
To make accessing ReShade more convenient while playing, follow these steps to adjust your controls:
- Choose a Button for ReShade Menu: Decide on a button on your Steam Deck that you’d like to use to open the ReShade menu. It’s a good idea to use one of the back buttons for easy access.
- Map the Button: You will map your chosen button to function as the “Pos1” key, which is the default key to open the ReShade menu in-game.
- Set Up the Right Trackpad as a Mouse: Configure the right trackpad to act as a mouse, with a press of the trackpad acting as a mouse click. This setup will help you navigate the ReShade menu.
- Optional – Quick Toggle for ReShade: If you’d like, you can also set up a quick toggle to turn ReShade on or off in-game. This is done by mapping another button to the “End” key within the ReShade settings. This step is optional but can be convenient.
- Finalize Your Setup: After configuring your controls, you might want to remove or lock these settings to prevent accidental adjustments during gameplay.
By integrating these steps, you’ll have a seamless way to run your game, access ReShade, and make on-the-fly adjustments to enhance your gaming experience on the Steam Deck.
Extra Step: Use a Preset
ReShade allows for custom settings, but if you’re looking for a quick and easy way to improve your game’s visuals without the trial and error, using a preset is a great option. Presets are pre-configured settings made by other users that you can download and apply to your games. Here’s how to use a preset for ReShade:
- Find a Preset: Websites like NexusMods host a variety of ReShade presets for different games. Search for a ReShade preset specifically designed for the game you want to enhance. Make sure the preset is compatible with the version of the game and ReShade you’re using, but this has never been an issue to me.
- Download the Preset: Once you’ve found a preset you like, download it. Preset files are typically shared as
.inifiles. - Install the Preset: To install the preset, you’ll need to place the downloaded
.inifile into the same directory where the game’s executable file is located. This is usually the same folder where you installed ReShade. - Activate the Preset in ReShade: Launch your game and open the ReShade menu by pressing the button you’ve configured. Within the ReShade menu, look for the option to load a preset. Navigate to the preset file you’ve placed in the game’s directory and select it. The preset should now be applied to your game.
- Adjust if Necessary: While presets are designed to be used as-is, you might find that you want to tweak some settings to better suit your preferences. Feel free to adjust any settings as needed.
Using a preset can save you a lot of time and give you a professional-looking visual enhancement without needing to understand every detail of ReShade’s settings. Plus, exploring presets can give you ideas for creating your custom settings in the future. Enjoy the new look of your game with minimal effort!
Play and See the Difference!
Now, when you start a game, you’ll notice it can look a lot better. Play around with the settings to see what you like best. Each game can look a little different, so feel free to experiment.
Conclusion
And that’s it! You’ve just made your games on the Steam Deck look cooler with ReShade. If you ever get stuck or want to try more effects, there are lots of helpful people online who love talking about ReShade. Have fun playing your beautiful games!
Resources & Links
- ReShade Website: https://reshade.me/
- reshade-linux on GitHub: https://github.com/kevinlekiller/reshade-steam-proton
- Nexus Mods: https://www.nexusmods.com/
Leave a Reply